Because why do a project when you have time and resources, when you can catch it (and yourself) unawares?
When it comes to home improvement projects, I tend to have a cat-like approach. I meander slowly and aimlessly for a while, looking like I have absolutely zero interest, before suddenly and viciously mounting an attack, pouncing on my unsuspecting prey – be it a pantry that needs organizing or a closet that needs decluttering. This used to manifest as late-night room-rearranging – why sleep when you can move your desk or alphabetize your book collection, setting up a library checkout system for your family? I’ve also been known to determine that a wall needs sprucing up right now – I can recall a time in college when I was not at a Husky game (for what reason, I couldn’t tell you), and decided in my boredom to repaint the bathroom at our rental house. I did a good job, too.
The funny thing about these projects is that they typically come completely out of the blue – something that I didn’t know needed to happen until all of a sudden it was imperative. The project I completed today was… not that. In fact, it has been on the list for years. When we moved in to our current house, it was clear that the previous owners had taken a bit of a shine to a cabernet red accent color. The kitchen, living room, bedroom and powder room each sported an accent wall in the hue. Needless to say, I took a week off of work when we moved in and almost immediately got rid of three of the four. The powder room remained unchanged because, honestly, I just didn’t bother.
Then, somewhere around June of this year, I decided that it was time for the final red wall to be erased. Thank you, pregnancy nesting. We had painted the adjacent family room about a year previously, and the fresh green-toned white that I had picked had me excited to freshen up the powder room and continue my leafy-green theme. I had briefly toyed with the idea of putting up wallpaper (like this, or this) in the baby’s nursery but had ultimately decided against it in favor of clean white walls and a very fun safari rug. Instead, I decided to replace the painted accent wall in the powder room with something I had only ever removed from a space: wallpaper.
I ordered up my Opalhouse wallpaper from Target (on June 4th, my order history tells me) and then I ignored my project. Rick periodically asked when I was going to wallpaper and I noncommittally replied. Shortly before the baby came, he painted the bathroom white in order to prepare for the wallpaper. I did not wallpaper. We changed out the light fixture. I still did not wallpaper. Mid-September, I ordered a wallpaper smoothing toolkit. It arrived, I set it on the kitchen counter, and I still did not wallpaper. Then, this morning, I woke up and was struck with inspiration. Today, I would wallpaper.
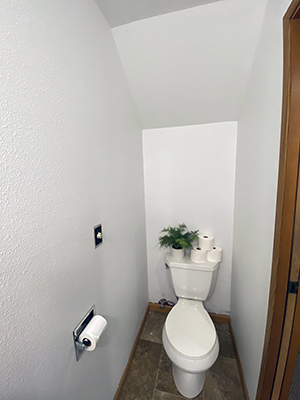
I wasted no time. “E, wanna watch me wallpaper?” I said, chuckling at myself. I got out all my supplies. I put the baby in the bouncer just outside the bathroom, put on some music, and got to work. Measure and pre-cut all panels, the directions included with the wallpaper said. Nope, don’t have time for that. It is helpful to have two people, the instructions said. Does my 11-week-old count? Work slowly and carefully, the notes warned. I don’t have time for that, I’m HOME IMPROVING, here! I unrolled my first roll, reached up to the ceiling, and started peel-and-sticking. I was so excited that I forgot to use my bag-o-tools from Amazon. I was just going for it! I got a few feet down the wall and E decided she had Had Enough and was Ready for A Nap. I smoothed the paper down a little more and stepped back, pleased with my progress thusfar. Here’s where I left the project when I took the baby up to her crib:
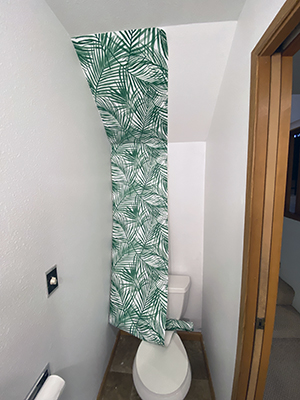
And here’s what the room looked like 10 minutes later when I came back downstairs:

To be entirely honest, I was not surprised. As soon as I walked away, I started to hear the telltale crinkling, un-sticking noise indicating that my hand-smoothing of the paper just wasn’t cutting it. I remembered the wallpapering tools and got to work un-sticking the paper from itself and trying again. I wish that there was video of me working on this project, because I will tell you – it was not our best nap. Every 5-10 minutes, I was running back up the stairs to progressively work through our “get yourself back to sleep” routine, but I think the baby was frustrated that she was missing out on the fun. I tried not to get frustrated, reminding myself that it was not her fault that I had decided to do this project on a random morning with no planning and no Rick around to help (either with the project or the baby). This was all on me.
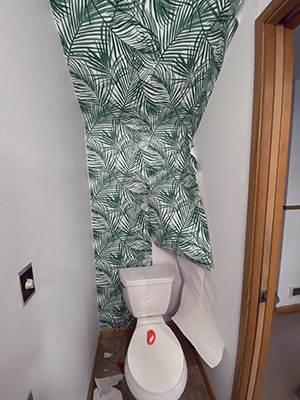
Eventually, she did go to sleep, and I started cruising. Luckily, the paper I chose has a pretty forgiving pattern. I did very well on the first strip, and even fairly well matching up the second vertical strip. The trouble came when I had to match up two seams on one piece – things got a little wrinkly. Eventually, I got it all worked out, though, and the toilet paper sits in front of that part anyway. I gleefully tape-measured and X-acto-knifed and slicer-ed my way through the rest of the wall, racing against the end of naptime. I will say that I would absolutely recommend this style of wallpaper – it seems eminently manageable and allowed me lots of adjustment, un-sticking and re-sticking as needed, until I smoothed it down with my handy scraper tool. The second vertical strip was definitely more challenging (remember, I cut nothing in advance), because I was dealing with the matching and also with a piece wider than the wall on which I was trying to work. Toward the end, I just peeled all the backing off of the paper, preferring to deal with the sticky vinyl on its own so that I could maneuver it around the toilet. This resulted in a lot of wallpaper sticking to itself, but I was able to separate it fairly easily. Here’s the final before and after:
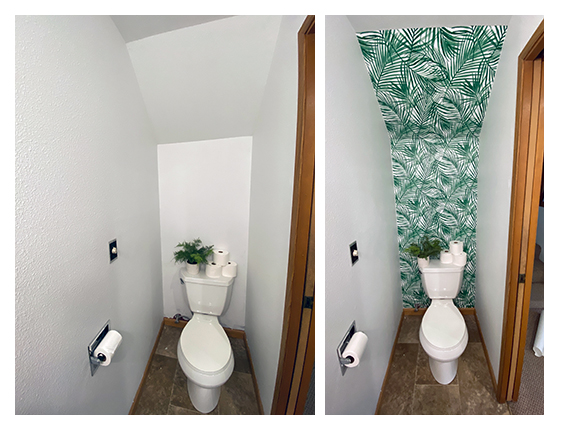
I am super pleased. It’s not a huge change, but it’s a bit of whimsy in our house and it makes me smile. The whole project took me about an hour and a half, including nap- and feeding-related interruptions. Ultimately, actual hands-on was probably 45 minutes. The cost was about $75 and included two rolls of wallpaper (of which I have about 3/4 of a roll left over) and the toolkit. The white paint was leftover from the nursery. All in all, it’s one of those things that has been on my list for a long, long time and, even more than the aesthetics of the finished project, I’m glad to be able to cross it off. Perhaps would have been smart to do pre-baby, but honestly I don’t think my pregnant self could have wedged in there, so it’s probably for the best that I waited. And, like say, I do like to sneak up on my projects when they least expect me.
